How to Create Journal Entries in QuickBooks Online
How to Create Journal Entries in QuickBooks Online
A journal entry records an accounting transaction directly to the ledger. Use one to adjust account balances, correct errors, post accruals and depreciation, or record anything that does not go through a standard QuickBooks form — such as the bounced cheque in this example. Every entry must balance: total debits equal total credits.
Step 1 – Open a New Journal Entry
A Create (+) – Click the Create button at the top of the left navigation bar to open the transaction menu.
B Journal entry – Select Journal entry under the Other column.
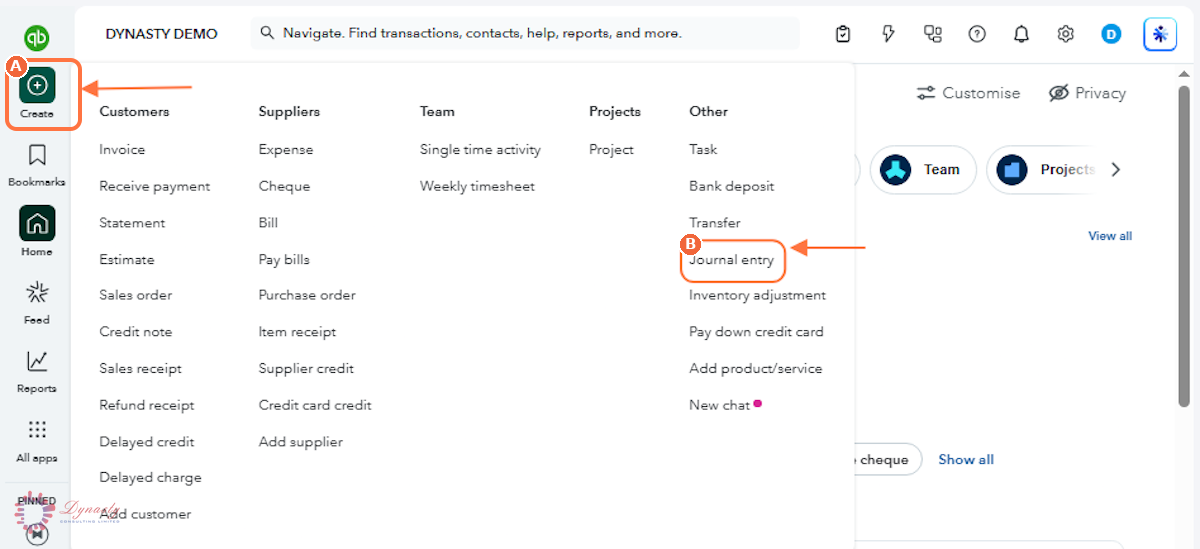
Figure – Opening a new journal entry
Step 2 – Enter the Debit and Credit Lines and Save
Check the Total row beneath the lines before saving — the debit and credit columns must show the same figure, as they do here at Ksh 100,000.00. QuickBooks will not save an entry that does not balance.
A Journal date – The date the adjustment takes effect — it decides which accounting period the entry falls into.
B Account (line 1) – Select the first account affected. In this example, Accounts Receivable is credited to reverse a cheque that bounced.
C Credits – Enter the credit amount for that account.
D Description (line 1) – Explain the purpose of the entry so it makes sense to whoever reviews the books later.
E Name – Select the customer, supplier or employee the line relates to. This is required when the account is Accounts Receivable or Accounts Payable.
F Account (line 2) – Select the second account affected — here the bank account the cheque was originally deposited into.
G Debits – Enter the debit amount. Total debits must equal total credits.
H Description (line 2) – Repeat the explanation on the second line so both sides of the entry are documented.
I Save and new – Saves this entry and opens a blank form for the next one. Use the arrow beside it for Save and close instead.
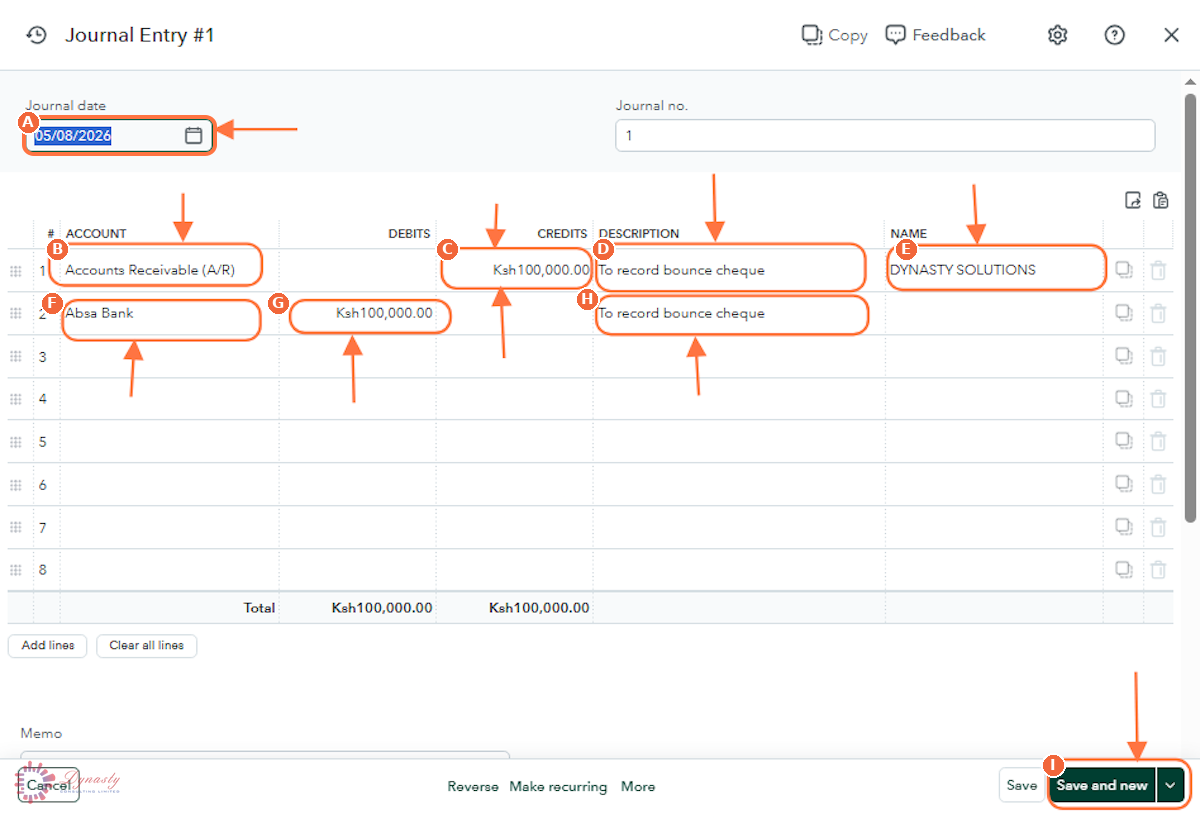
Figure – Entering the debit and credit lines
How to Create Journal Entries in QuickBooks Online
A journal entry records an accounting transaction directly to the ledger. Use one to adjust account balances, correct errors, post accruals and depreciation, or record anything that does not go through a standard QuickBooks form — such as the bounced cheque in this example. Every entry must balance: total debits equal total credits.
Last Updated
Aug 19, 2026
Software
QuickBooks Online 2026
What You Will Learn
By the end of this guide you will be able to open a new journal entry, enter the debit and credit lines with their accounts and descriptions, attach a customer or supplier name where needed, and save a balanced entry.
Before You Begin
Know which accounts to debit and credit before you start, and have the supporting document — the bank advice, correction memo or adjustment schedule — to hand. Journal entries post directly to the ledger, so they should be entered by someone who understands double entry.
Important
Journal entries bypass the normal forms, so they do not update customer or supplier balances the way an invoice or bill does — except when you post to Accounts Receivable or Accounts Payable, where a Name is required. Use standard forms wherever one exists, and keep journals for genuine adjustments.
Step 1 – Open a New Journal Entry
There are no comments for now.
to be the first to leave a comment.